# PART 1. agl-app-warehouse Environmental Construction Manual
[TOC]
## 1. Basic Environment
### 1.1 Hardware
* cpu ---------------- 3.30GHz or more
* Memory---------- 4Gbytes or more
* HDD--------------- 100Mbytes or more
### 1.2 Software
* Centos7.2
* JDK 1.8
* apache-tomcat-8
* Redis
* MySQL 5.7.22
*The IP address used in this environment construction is "192.168.200.107"[^1].
[^1]: The IP address in this manual is replaced by "$IP", so please rewrite it to the IP address which used in the actual environment construction.
## 2. JDK
### 2.1 Installation
```shell
# yum install java-1.8.0-openjdk
```
### 2.2 Configuration
#### 2.2.1 Environmental Variables Configuration
```shell
# echo "export JAVA_HOME=$(readlink -e $(which java)|sed 's:/bin/java::')" > /etc/profile.d/java.sh
```
```shell
# echo "PATH=\$PATH:\$JAVA_HOME/bin" >> /etc/profile.d/java.sh
```
```shell
# source /etc/profile.d/java.sh
```
### 2.3 Confirmation
```shell
# java -version
OpenJDK version "1.8.0_171"
OpenJDK Runtime Environment (build 1.8.0_171-b10)
OpenJDK 64-Bit Server VM (build 25.171-b10, mixed mode)
```
## 3. Tomcat
### 3.1 Installation
#### 3.1.1 New User
```shell
# useradd -s /sbin/nologin tomcat
```
#### 3.1.2 Download
```shell
# mkdir -p /usr/local/src/tomcat
```
```shell
# cd /usr/local/src/tomcat/
```
```shell
# wget http://ftp.riken.jp/net/apache/tomcat/tomcat-8/v8.5.31/bin/apache-tomcat-8.5.31.tar.gz
```
#### 3.1.3 "tar.gz" Deployment
```shell
# tar zxvf apache-tomcat-8.5.31.tar.gz
```
```shell
# mv apache-tomcat-8.5.31 /opt/
```
```shell
# chown -R tomcat. /opt/apache-tomcat-8.5.31
```
```shell
# ln -s /opt/apache-tomcat-8.5.31 /opt/tomcat
```
### 3.2 Configuration
#### 3.2.1 Environmental Variables Configuration
```shell
# echo 'export CATALINA_HOME=/opt/tomcat' > /etc/profile.d/tomcat.sh
```
```shell
# source /etc/profile.d/tomcat.sh
```
#### 3.2.2 Tomcat User Configuration
```shell
# vi /opt/tomcat/conf/tomcat-users.xml
```
Add the following contents in "tomcat-users.xml":
```xml
```
```shell
# vi /opt/tomcat/webapps/manager/META-INF/context.xml
```
Remove "< value >... < / value > "
#### 3.2.3 Service Definition File
Create "/etc/systemd/system/tomcat.service" and store it as follows:
Modify the permission of the created definition file to 755.
```shell
# vi /etc/systemd/system/tomcat.service
```
```shell
# chmod 755 /etc/systemd/system/tomcat.service
```
File contents :
```
[Unit]
Description=Apache Tomcat 8
After=syslog.target network.target
[Service]
User=tomcat
Group=tomcat
Type=oneshot
PIDFile=/opt/tomcat/tomcat.pid
RemainAfterExit=yes
ExecStart=/opt/tomcat/bin/startup.sh
ExecStop=/opt/tomcat/bin/shutdown.sh
ExecReStart=/opt/tomcat/bin/shutdown.sh;/opt/tomcat/bin/startup.sh
[Install]
WantedBy=multi-user.target
```
#### 3.2.4 Auto Start
Auto start when the server starts.
```shell
# systemctl enable tomcat
```
#### 3.2.5 Set of Firewalld
Create '/etc/firewalld/services/tomcat.xml ' and write it as follows:
```shell
# vi /etc/firewalld/services/tomcat.xml
```
```shell
# firewall-cmd --add-service=tomcat --permanent
```
```shell
# firewall-cmd reload
```
File contents:
```xml
Apache Tomcat 8
Apache Tomcat 8
```
### 3.3 Launch
```shell
# systemctl start tomcat
```
### 3.4 Confirmation
Access to 'http://$IP:8080/'
## 4. Redis
### 4.1 Installation
```shell
# yum -y install epel-release
```
```shell
# yum install -y redis
```
### 4.2 Configuration
#### 4.2.1 "redis.conf" File Modification
```shell
# vi /etc/redis.conf
```
Before:
```
bind 127.0.0.1
#requirepass foobared
```
After:
```
#bind 127.0.0.1
requirepass appmarket
```
#### 4.2.2 Auto Start
Auto start when the server starts.
```shell
# systemctl enable redis.service
```
#### 4.2.3 Set of Firewalld
```shell
# firewall-cmd --add-port=6379/tcp --permanent
```
```shell
# firewall-cmd reload
```
### 4.3 Launch
```shell
# systemctl start redis.service
```
### 4.4 Confirmation
```shell
# redis-cli -a appmarket
redis 127.0.0.1:6379> ping
PONG
```
## 5. MySql
### 5.1 Installation
#### 5.1.1 Preparation
```shell
# yum remove mariadb-libs.x86_64
```
```shell
# rm -rf /var/lib/mysql
```
#### 5.1.2 Installation
```shell
# yum localinstall https://dev.mysql.com/get/mysql57-community-release-el7-8.noarch.rpm
```
```shell
# yum -y install mysql-community-server
```
#### 5.1.3 Correct Installation Confirmation
```shell
# mysqld --version
mysqld Ver 5.7.22 for Linux on x86_64 (MySQL Community Server (GPL))
```
### 5.2 Configuration
#### 5.2.1 MySQL User Configuration
##### 5.2.1.1 User Configuration
Get the password generated from the record file and use it when executing the "mysql_secure_installation "command.
```shell
# systemctl start mysqld
# cat /var/log/mysqld.log | grep root
xxxx[Note] A temporary password is generated for root@localhost: uhsd!Aid;3Zt
```
mysql_secure_installation Command is being executed:
```
NOTE:+E23:K42 RUNNING ALL PARTS OF THIS SCRIPT IS RECOMMENDED FOR ALL MySQL
SERVERS IN PRODUCTION USE! PLEASE READ EACH STEP CAREFULLY!
In order to log into MySQL to secure it, we'll need the current password for the root user. If you've just installed MySQL, and you haven't set the root password yet, the password will be blank,so you should just press enter here.
Enter current password for root (enter for none):uhsd!Aid;3Zt
OK, successfully used password, moving on…
Setting the root password ensures that nobody can log into the MySQL root user without the proper authorisation.
Set root password? [Y/n] y
New password: 123456
Re-enter new password: 123456
Password updated successfully!
Reloading privilege tables..
… Success!
By default, a MySQL installation has an anonymous user, allowing anyone to log into MySQL without having to have a user account created for them. This is intended only for testing, and to make the installation go a bit smoother. You should remove them before moving into a production environment.
Remove anonymous users? [Y/n] y
… Success!
Normally, root should only be allowed to connect from 'localhost'. This ensures that someone cannot guess at the root password from the network.
Disallow root login remotely? [Y/n] n
… Success!
By default, MySQL comes with a database named 'test' that anyone can access. This is also intended only for testing, and should be removed before moving into a production environment.
Remove test database and access to it? [Y/n] n
- Dropping test database…
… Success!
- Removing privileges on test database…
… Success!
Reloading the privilege tables will ensure that all changes made so far will take effect immediately.
Reload privilege tables now? [Y/n] y
… Success!
Cleaning up…
All done! If you've completed all of the above steps, your MySQL installation should now be secure.
Thanks for using MySQL!
[root@server1 ~]#
```
##### 5.2.1.2 Add User Permissions
```shell
# mysql -u root -p
Enter password:123456
```
```shell
mysql> grant all privileges on *.* to root@'%'identified by '123456';
```
#### 5.2.2 Modification of "/etc/my.cnf "
```shell
# vi /etc/my.cnf
```
Add the following contents in my "my.cnf file":
```
[mysqld]
character_set_server = utf8
```
#### 5.2.3 Auto Start
```shell
# systemctl enable mysqld.service
```
#### 5.2.4 Set of Firewalld
```shell
# firewall-cmd --permanent --zone=public --add-port=3306/tcp
```
```shell
# firewall-cmd --permanent --zone=public --add-port=3306/udp
```
```shell
# firewall-cmd --reload
```
### 5.3 Launch
```shell
# systemctl start mysqld.service
```
### 5.4 Confirmation
```shell
# mysql -u root -p
Enter password:123456
```
```shell
mysql> use mysql;
Database changed
```
```
mysql> select host,user from user;
+--------------+------+
| host | user |
+--------------+------+
| localhost | root |
| 192.168.1.1 | root |
| % | root |
+--------------+------+
```
## 6. AglAppWarehouse
Copy the war-file("warehouse.war" and "webservice.war" ) into the "/opt/tomcat/webapps" directory.
### 6.1 Server Construction
#### 6.1.1 Server Configuration
##### 6.1.1.1 Redis Information Settings
```shell
# vi /opt/tomcat/webapps/webservice/WEB-INF/classes/redis.properties
```
Modify the file "redis.properties" as follows :
```
redis.host=192.168.200.107
redis.port=6379
redis.password=appmarket
```
##### 6.1.1.2 App File Saving Path Settings
```shell
# mkdir -p -m 777 /data/appmarket/log/web
```
```shell
# mkdir -p -m 777 /data/appmarket/log/webservice
```
```shell
# vi /opt/tomcat/webapps/webservice/WEB-INF/classes/fileManager.properties
```
Modify the file "fileManager.properties" as follows :
```
upload_path=/data/appmarket/filesystem/
upload_path_checked=/data/appmarket/filesystem/
```
##### 6.1.1.3 Mybatis Info Settings
```shell
# vi /opt/tomcat/webapps/webservice/WEB-INF/classes/spring-mybatis.xml
```
Modify the file "spring-mybatis.xml" as follows :
```xml
```
#### 6.1.2 Database Configuration
```shell
# mysql -u root -p
Enter password:123456
```
```shell
mysql> source /data/ftp/pub/db_data/appmarket.sql;
```
### 6.2 Launch
```shell
# systemctl start tomcat
```
### 6.3 Set of Port
```shell
# firewall-cmd --add-masquerade
```
```shell
# firewall-cmd --add-forward-port=port=80:proto=tcp:toport=8080 --permanent
```
### 6.4 Confirmation
Access to "http://$IP:8080/warehouse/"
# PART 2. Code Compilation Manual
## 1. Base Environment
* eclipse :Neon.2 Release (4.6.2)
* apache-tomcat-8.0
* JDK 1.8
## 2. New Project
### 2.1 Create a Root Maven Project
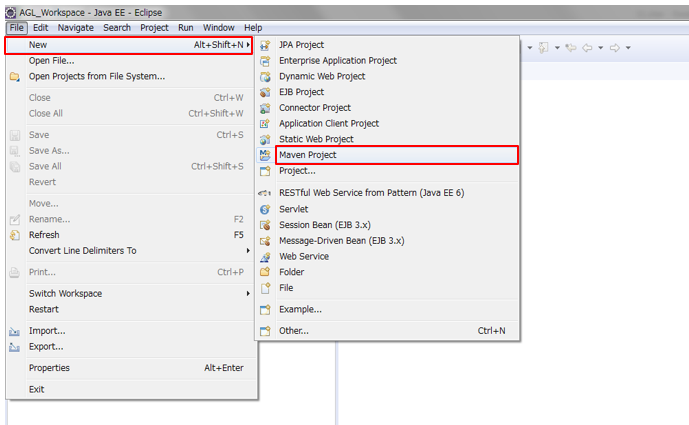
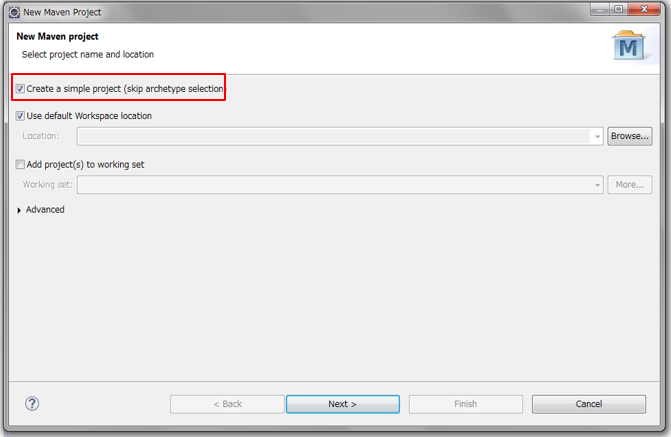
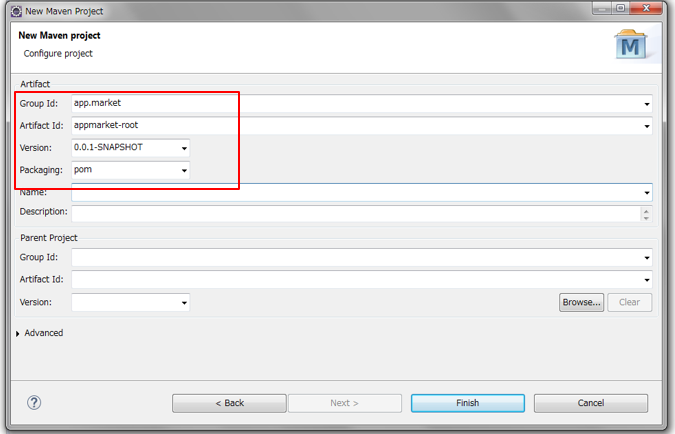
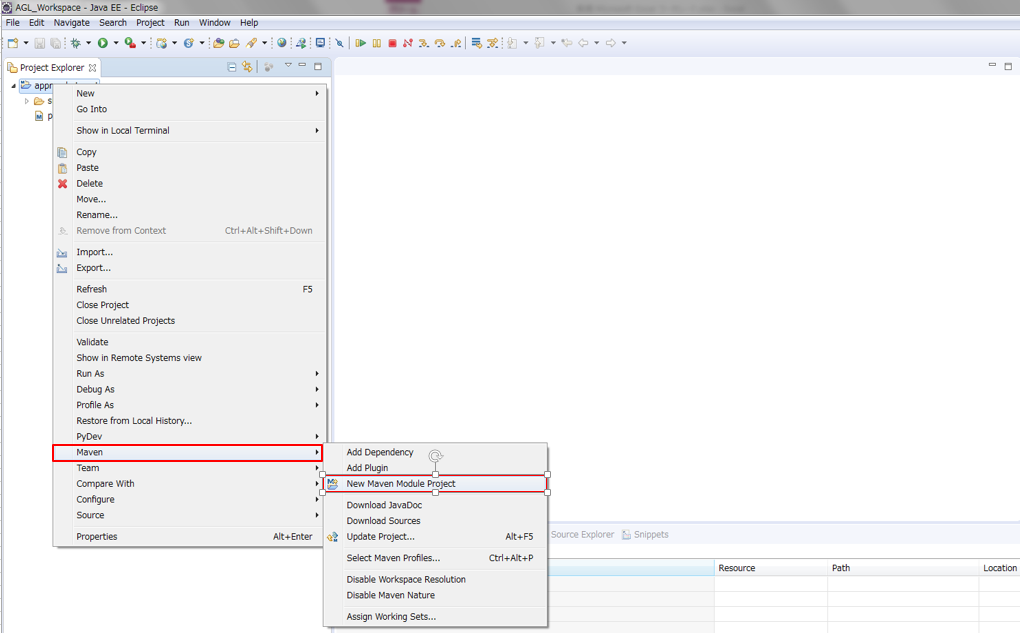
### 2.2 Create Maven Modules
There are six maven modules.
1. appmarket-core
2. appmarket-model
3. appmarket-persistence
4. appmarket-utils
5. warehouse
6. webservice
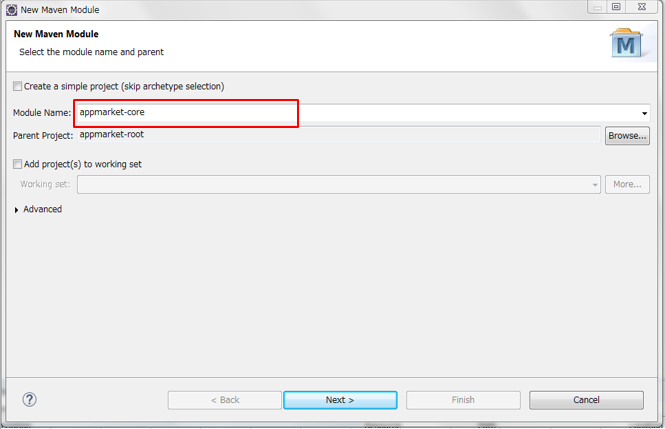
Input the module name by maven modules.
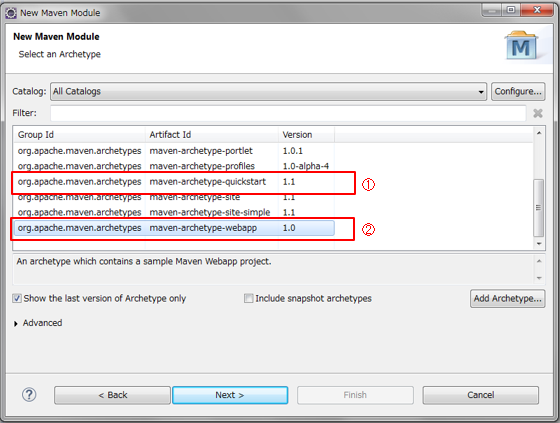
Selecting an archetype by maven modules( 1,2,3,4 choose ① , 5,6 choose ②)
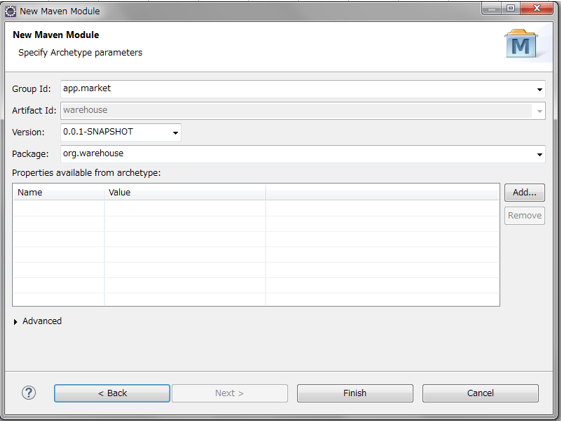
### 2.3 Replace Files
Replace the workspace project files of eclipse with the files in the source code.
## 3. Code Compilation
### 3.1 Import Maven Projects
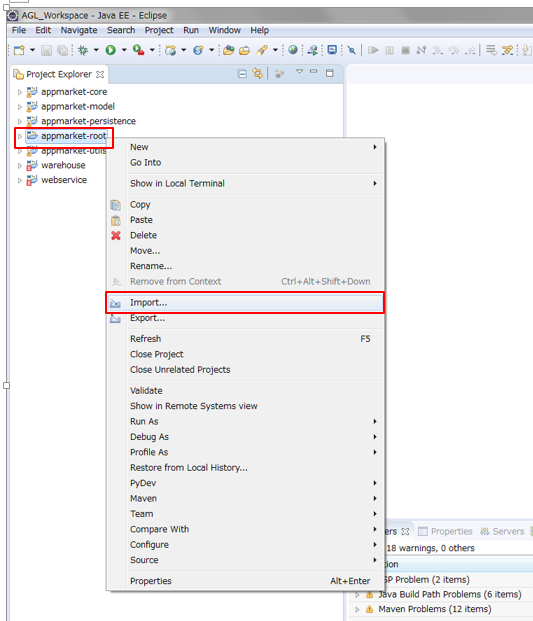
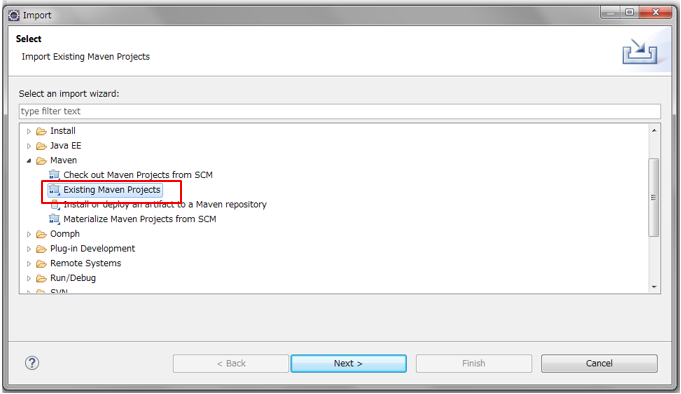
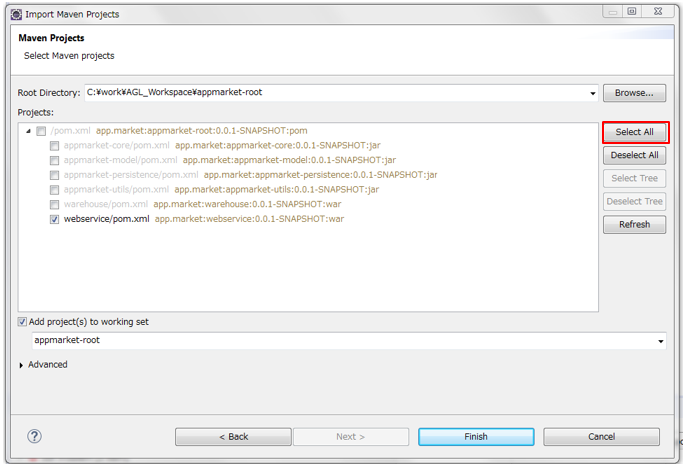
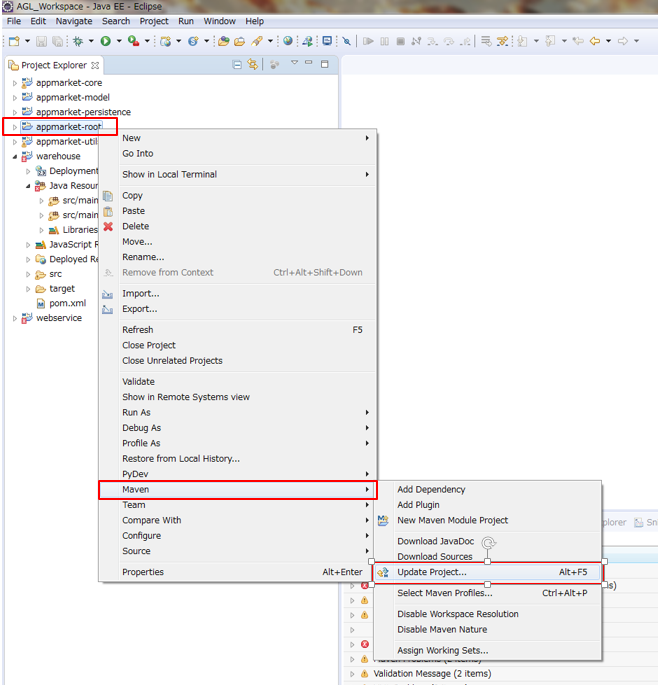
### 3.2 Update Project
## 4. War Export
### 4.1 Export
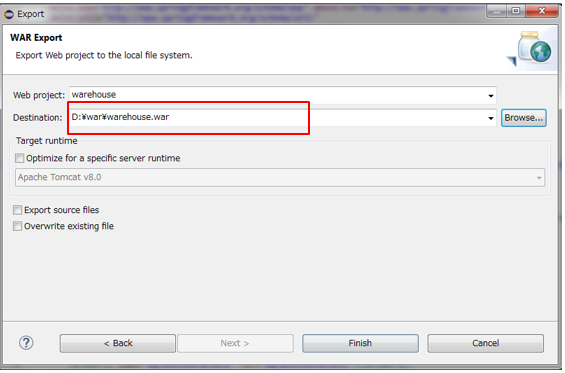
Export "warehouse.war "and "webservice.war".
Right click on the project name(warehouse)
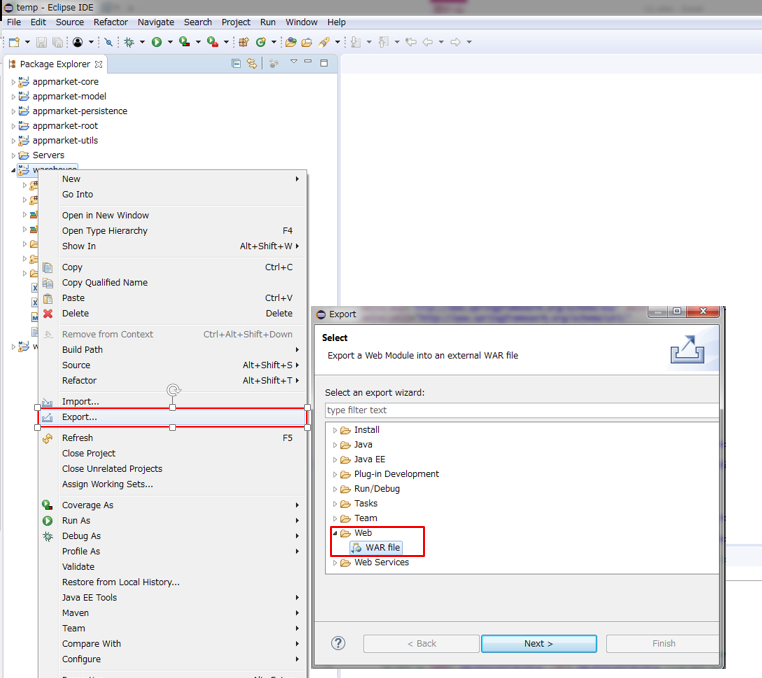
Select the save Path of war file
