# Build using an IDE
One option for building your application using XDS is to use
an Integrated Development Environment
([IDE](https://en.wikipedia.org/wiki/Integrated_development_environment)).
Many IDEs exist (e.g. [NetBeans](https://netbeans.org/),
[Visual Studio Code](https://code.visualstudio.com/),
[Qt Creator](https://www.qt.io/),
[Eclipse](https://www.eclipse.org/), and so forth).
This section first develops an XDS configuration file
(i.e. `xds-project.conf`) and then provides two
examples, NetBeans and Visual Studio, that do the following.
- NetBeans: Creates two separate build configurations
for a project, which makes it easy to switch back and forth
between types of builds.
- Visual Studio: Creates tasks that allow you to build an example
based on CMake templates.
## XDS Configuration File
This section shows how to create an XDS configuration file
(i.e. `xds-project.conf`) or how to re-use an existing file.
For example, the following commands set up the configuration
file for an `aarch64` SDK to cross-build the
application for a Renesas Gen3 board.
```bash
# create file at root directory of your project
# for example:
# MY_PROJECT_DIR=/home/seb/xds-workspace/helloworld-native-application
cat > $MY_PROJECT_DIR/xds-project.conf << EOF
export XDS_AGENT_URL=localhost:8800
export XDS_PROJECT_ID=4021617e-ced0-11e7-acd2-3c970e49ad9b
export XDS_SDK_ID=c226821b-b5c0-386d-94fe-19f807946d03
EOF
```
## NetBeans
This section creates two configurations: one to compile the
project natively using native GNU gcc, and one to cross-compile
the project using XDS.
Having two configurations allows you to easily switch between them
using NetBean's **Run -> Set Project Configuration** menu.
### Native Configuration
Follow these steps to create the native configuration:
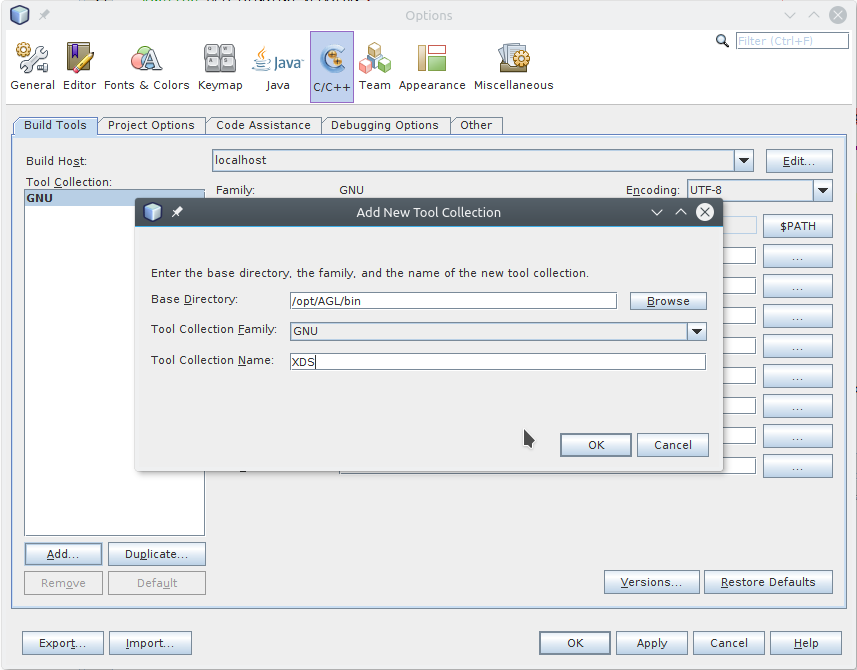
1. Open the **Tools** -> **Options** menu.
2. Open the **C/C++** tab.
3. Click on the **Add** button in the **Build Tools** sub-tab:
{:: style="width:90%; max-width:700px; margin:auto; display:flex"}
4. Fill the **Make Command** and **Debugger Command** fields to point to the XDS tools:
{:: style="width:90%; max-width:700px; margin:auto; display:flex"}
5. Click **OK**.
6. Select the **File** -> **New Project** menu item to declare the
project and create a native configuration.
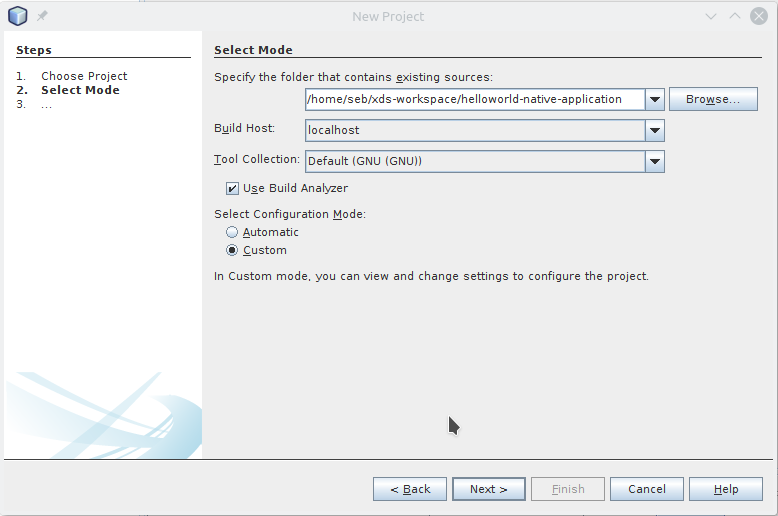
7. Select **C/C++ Project with Existing Sources** and click on **Next**.
8. Specify your project directory and set **Select Configuration Mode** to
"Custom".
Be sure to keep **Tool Collection** set to "Default GNU" in order to create a
*native configuration*, which is based on the native GNU GCC.
9. Click **Next**.
{:: style="width:90%; max-width:700px; margin:auto; display:flex"}
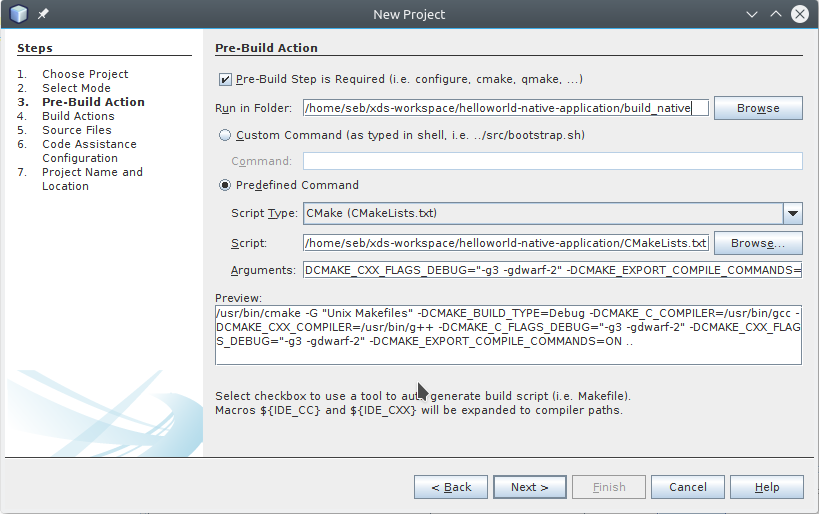
10. Update the **Run in Folder** field to add the `build_native` suffix.
Doing so results in the build files being located in the
`build_native` sub-directory.
Be sure to keep the defaults for all other settings and then click **Next**.
{:: style="width:90%; max-width:700px; margin:auto; display:flex"}
11. Click through **Next** several times while always keeping the
default settings until the **Finish** button appears.
12. Click **Finish** to complete the creation of the native configuration.
### Cross-Compilation Configuration
Follow these steps to create the configuration for cross-compilation
based on the XDS tools:
1. Edit project properties (using menu **File** -> **Project Properties**)
to add a new configuration that will use XDS to cross-compile
your application for example for a Renesas Gen3 board.
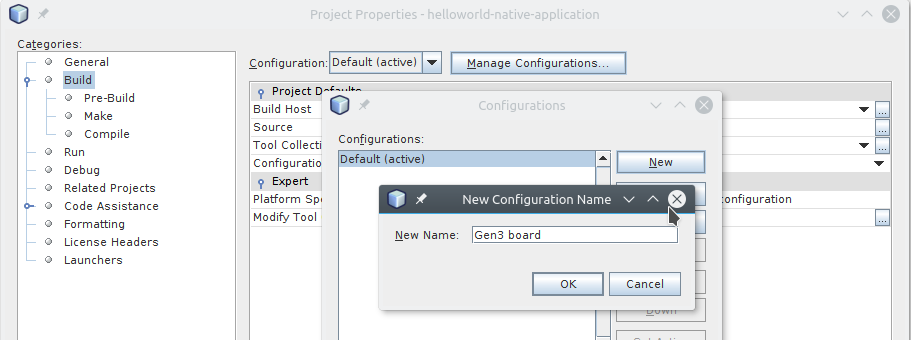
2. in the **Build** category, click on **Manage Configurations** button
and then **New** button to add a new configuration named for example
"Gen3 board".
{:: style="width:90%; max-width:700px; margin:auto; display:flex"}
3. Click the **Set Active** button.
4. Select the **Pre-Build** sub-category, and set the following:
- Working Directory: `build_gen3`
- Command Line: `xds-cli exec -c ../xds-project.conf -- cmake -DRSYNC_TARGET=root@renesas-gen3 -DRSYNC_PREFIX=/opt ..`
- Pre-build First: `ticked`<br/><br/>
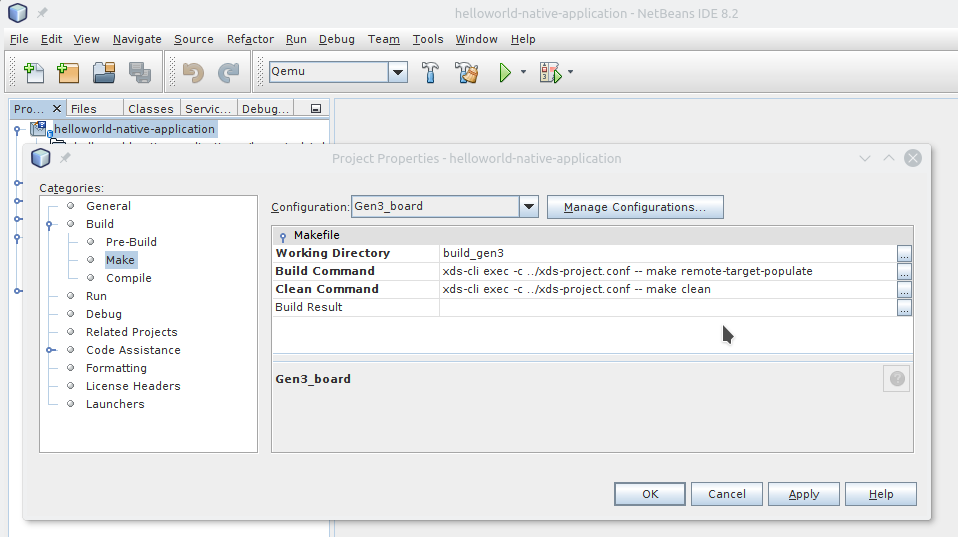
5. Select the **Make** sub-category, and set the following:
- Working Directory: `build_gen3`
- Build Command: `xds-cli exec -c ../xds-project.conf -- make remote-target-populate`
- Clean Command: `xds-cli exec -c ../xds-project.conf -- make clean`<br/><br/>
{:: style="width:90%; max-width:700px; margin:auto; display:flex"}
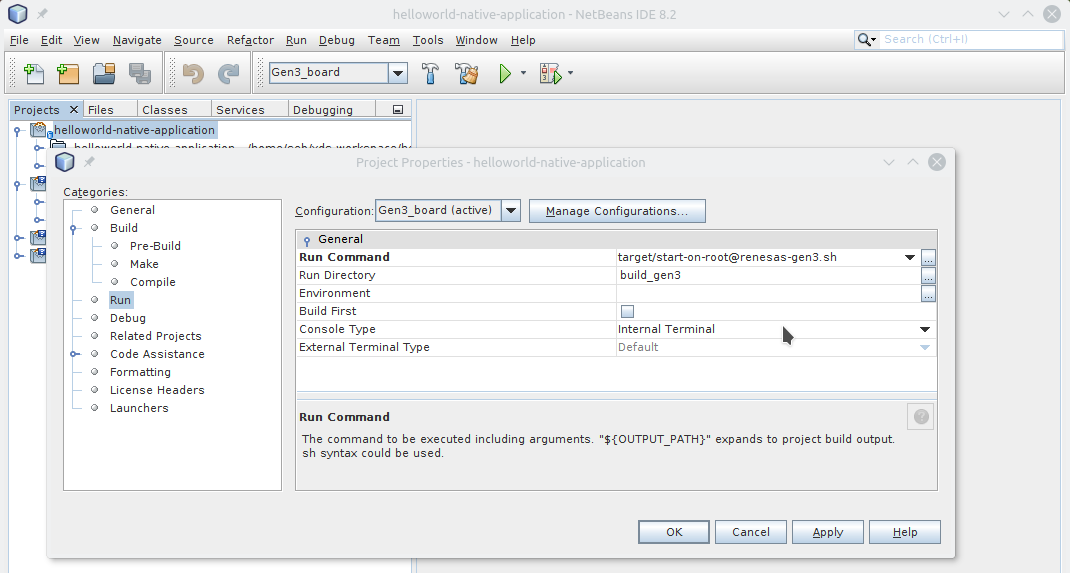
6. Select the **Run** sub-category, and set the following:
- Run Command: `target/start-on-root@renesas-gen3.sh`
- Run Directory: `build-gen3`<br/><br/>
{:: style="width:90%; max-width:700px; margin:auto; display:flex"}
7. Click **OK** to save settings.
By changing the configuration from **Default** to **Gen3 board**, you can
compile your helloworld application natively, which is the default configuration.
Or, you can cross-compile your application using XDS for the Renesas Gen3 board,
which is the Gen3 board configuration.
## Visual Studio Code
This section presents a Visual Studio example that creates tasks
that allow you to build an example that is based on CMake templates.
Follow these steps:
1. Start Visual Studio Code and open your project using the
following commands:
```bash
cd $MY_PROJECT_DIR
code . &
```
2. Add new tasks by entering the `Ctrl+Shift+P` key combination and selecting
the `Tasks: Configure Task` command.
A list of task runner templates appears.
3. Define your own tasks.
Following is an example that builds the
[helloworld-native-application](https://github.com/iotbzh/helloworld-native-application)
that is based on CMake templates.
```json
{
"version": "2.0.0",
"type": "shell",
"presentation": {
"reveal": "always"
},
"tasks": [
{
"label": "clean",
"type": "shell",
"command": "/bin/rm -rf ${workspaceFolder}/build/* && mkdir -p build && echo Cleanup done.",
"problemMatcher": []
},
{
"label": "pre-build",
"type": "shell",
"group": "build",
"command": "/opt/AGL/bin/xds-cli exec --rpath build --config xds-project.conf -- cmake -DRSYNC_TARGET=root@renesas-gen3 -DRSYNC_PREFIX=/opt ../",
"problemMatcher": [
"$gcc"
]
},
{
"label": "build",
"type": "shell",
"group": "build",
"command": "/opt/AGL/bin/xds-cli exec --rpath build --config xds-project.conf -- make widget",
"problemMatcher": [
"$gcc"
]
},
{
"label": "populate",
"type": "shell",
"command": "/opt/AGL/bin/xds-cli exec --rpath build --config xds-project.conf -- make widget-target-install",
"problemMatcher": []
}
]
}
```
4. Run a task by entering the `Ctrl+Shift+P` key combination and
selecting `Tasks: Run task` and then selecting the specific task.
For example, select `pre-build` to trigger pre-build task.
5. Optionally add keybindings that trigger tasks.
Following is an example:
```json
// Build
{
"key": "alt+f9",
"command": "workbench.action.tasks.runTask",
"args": "clean"
},
{
"key": "alt+f10",
"command": "workbench.action.tasks.runTask",
"args": "pre-build"
},
{
"key": "alt+f11",
"command": "workbench.action.tasks.runTask",
"args": "build"
},
{
"key": "alt+f12",
"command": "workbench.action.tasks.runTask",
"args": "populate"
},
```
<!-- section-note -->
**NOTES:**
- You can find more details about Visual Source Code keybindings
[here](https://code.visualstudio.com/docs/editor/tasks#_binding-keyboard-shortcuts-to-tasks).
- You can find more details about Visual Source Code tasks
[here](https://code.visualstudio.com/docs/editor/tasks).
<!-- end-section-note -->